• Touhou 6 New Classic Score Attack Ongoing!

    Read the submission rules, prizes and everything inbetween here:

    Good luck!

    Also check out the community art event here! Everyone is welcome!

Mystia's Marvelous Touhou Recipe Thread

YuyuFumo

Silly Ghost Princess
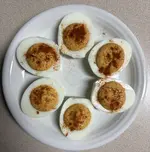
Today's recipe is inspired by Hell's very own Subterranean Sun, Utsuho Reiuji. It's an extra spicy twist on a classic deviled egg recipe that I'm incredibly fond of. The richness of the mayonnaise plays incredibly well with tangy mustard and garlicky sriracha, all of which is capped off by enough spice to make Satori and her pets break a sweat. You can tailor the recipe to how much heat you can handle, making it perfect for both easygoing egoists and lunatic princesses alike!
IMG_4184.webp
Okuu's Nuclear Hellfire Eggs
Makes 12 Eggs / 6 Servings
Ingredients:
  • 6 large eggs (50g each)
  • 60g Kewpie mayo
  • 20g Dijon mustard
  • 20g sriracha sauce
  • 5g hot sauce (whatever you can handle, I prefer habanero Tabasco)
  • 1/2 tsp cayenne powder
  • 1/2 tsp smoked paprika

Directions:
  1. Place the eggs in a large saucepan and cover two inches above them with warm water. Put it over high heat and watch for when the water starts to boil. Once it does, set a timer for five minutes.
  2. After five minutes of boiling, remove the saucepan from the heat and place a lid on it. Steam the eggs for an additional twenty minutes before transferring to a bowl of cold ice water. Let the eggs sit in the ice bath for at least twenty minutes, which will make the shells easier to remove.
  3. Use a silverware spoon to tap the bottom of the egg, which should crack and reveal an air pocket. Placing the tip of the spoon between the inside of the shell and the boiled whites, carefully move it up to peel the shell off the egg. Try to avoid digging into the egg while doing this, which will cause the white to peel off with the shell. Repeat this process for all six eggs until every portion of the shell is removed. I've found that doing this under cool running water helps to make this step easier.
  4. Dry off the hard boiled eggs before slicing them longways down the middle. In a separate bowl, pop the yolks out of the egg whites before setting the empty whites aside. Either grate the yolks through a fine mesh strainer into a large mixing bowl or use a fork to manually mash them up to get rid of any large yolk chunks.
  5. Mix the crushed yolks, mayonnaise, mustard, sriracha, and hot sauce together with a flexible spatula. You should get an orange-colored mixture, to which you'll add the cayenne and paprika. Mix well again until you get a smooth filling (if a flexible spatula isn't cutting it, you can use a hand-mixer as well).
  6. Spoon the filling into a piping bag (or a sandwich bag with the corner cut off) and slowly pipe it into the empty egg whites where the yolks previously were. Going slow will ensure the most amount of filling gets into the white without leaving extra air in the pocket. Once finished, garnish the egg with a little extra paprika and/or cayenne.
  7. The eggs may be consumed now, but they will develop more flavor if you leave them in an airtight container in the refrigerator overnight. Once finished, these eggs may be enjoyed at barbeques, as an appetizer, or by themselves as a quick snack.
 
Last edited:
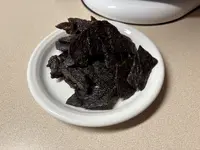
Darkness is creeping around the corner, as this next recipe is one that Rumia would find great enjoyment in. Making jerky at home is surprisingly cheap for how much of the stuff you get, at least compared to how expensive it is to buy at the market. You can make it from beef, pork, chicken, human, bison, turkey, the sky's the limit here. Marinades are also customizable, with my personal favorite being the backbone of this recipe. No sonanokas here, it'll be hard to not emulate Rumia's craving for flesh once you get a taste of this!

IMG_4212.webp
Rumia's Darkly Delicious Jerky
Makes ~12oz jerky per pound of meat

Ingredients:
  • 1lb (0.45kg) human flesh meat of choice*
  • 120mL cup soy sauce
  • 60mL Worcestershire sauce
  • 60mL honey
  • 1 tsp onion powder
  • 1 tsp garlic powder
  • 1/2 tsp ground black pepper
  • 1/4 tsp Meiling's Savory Goodness*
Equipment:
  • Dehydrator Machine
    • These are relatively inexpensive, but you can also use an oven to dry the meat if you must. However, this recipe will assume you're using a dehydrator like I am.
Directions:
  1. Trim all the excess fat and silver skin off your cut of meat. Place the trimmed meat in the freezer for 1-2 hours, allowing it to become partially frozen for ease of slicing.
  2. While the meat is freezing, prepare the marinade. Mix together soy sauce, Worcestershire sauce, honey, onion powder, garlic powder, black pepper, and MSG in a resealable gallon bag and shake well. Double check that all the honey is mixed in, as it can be difficult at times if you don't shake enough.
  3. Once partially frozen, cut the meat into slices that are between 1/4" (0.6cm) and 1/2" (1.2cm) thick, being consistent across all your cuts. If you're using a wider cut of meat, feel free to cut the slices into strips. Once finished, place the jerky slices into your marinade bag before mixing well. Leave this bag in the fridge for 12-18 hours, mixing every 4-6 hours to ensure an even marinade.
  4. After the marinading is finished, you'll need to dry off the excess liquid to prevent the jerky from steaming. Place a bunch of paper towels (or kitchen towels) on a plate. Use a pair of tongs to move the meat from the marinade bag onto the plate before patting both sides dry with another bundle of towels. Repeat this process with all the meat, moving to a dehydrator rack once visibly dry.
  5. Turn on the dehydrator to 160°F (70°C) and let the jerky dry for 4 hours. Bend a piece to see if any of the connective tissue turns white. If it does, then the jerky's done; if not, then let it go for another 30 minutes before repeating the test.
  6. Let the jerky cool before sealing in an airtight bag or bowl. Storing in the fridge is recommended if you plan on keeping it for over a week, but it's fine to sit out at room temperature with how much it's dried and salted. Try your best to not go full Rumia and eat it in a few sittings; it's harder than it looks.
*Notes:
  1. Try to stick with lean cuts of meat that won't have a lot of fat to trim off. Good options include chicken/turkey breasts, pork tenderloins, and 'round' (eye of round, top round, bottom round) cuts of beef.
  2. Despite popular belief, MSG is proven to be perfectly healthy to consume in small amounts. The initial panic was caused by sensationalized journalism in the 1950s that got whipped into a frenzy. If you're still not on board, consider that the Japanese (who originally isolated the compound from seaweed) eat the stuff frequently and live to very old age.
 
  1. Despite popular belief, MSG is proven to be perfectly healthy to consume in small amounts. The initial panic was caused by sensationalized journalism in the 1950s that got whipped into a frenzy. If you're still not on board, consider that the Japanese (who originally isolated the compound from seaweed) eat the stuff frequently and live to very old age.
Despite that being said, my Mama has gotten very sick from eating MSG before. I think she said she even had to go to the hospital from it before (but as she has been sent to the hospital from getting sick from many things, that could be just me conflating it with something else).
Though, considering you said that MSG is "healthy to eat in small amounts", then it could just be that she gets sick from eating stuff with too much MSG.
Even still, considering just how many things can make my Mama sick (mainly as a result of her acid stomach), then maybe she gets sicker to it than most.
I'm wary of eating anything with MSG in it as a result of me getting sick to a lot of the things my Mama does.
 
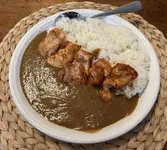
Coco Ichibanya! One of the best parts of going to Japan is visiting the curry houses and enjoying a nice place of curry rice after a long day of traveling. Unfortunately, Clownpiece Land doesn't have Cocos where I live, so I had to improvise and go digging around on Japanese Google to satisfy my hunger for rice and curry sauce. Most recipes I'd found were very similar to each other, and the end product was (dare I say) better than Coco Ichibanya itself! Though I typically like to post original recipes on this thread, I'll make an exception with how wonderful this curry rice is.

Coco Ichibanya!.webp

Komeiji Ichibanya Curry Rice
Makes ~3 servings of curry sauce

Ingredients:

  • 100g white onion
  • 30g carrot
  • 50g pork belly*
  • 2 Tbsp pork lard or vegetable oil
  • 600mL chicken broth
  • 2 Tbsp fried onions
  • 35g Golden Curry roux blocks
  • 1/2 tsp curry powder
  • 1 tsp Worcestershire sauce
  • 1 tsp tonkatsu or BBQ sauce
  • 1/2 tsp sugar
  • 1/8 tsp salt
  • 1/4 tsp ground white pepper*
  • 1/8 tsp instant coffee/espresso
  • 1/2 tsp distilled white vinegar
Equipment:
  • Blender
Directions:
  1. Slice the onion and carrot into thin semicircles. For the pork belly, cut it short ways into 1cm long 'fingers'. Heat the fat or oil in a medium pot over medium-high heat, then fry the onions until slightly burnt, about 10 minutes. Add the carrots and pork belly, cooking until the meat begins to change color, about 3 minutes.
  2. Pour in the chicken broth and stir the mixture. Add in some fried onions and simmer over medium heat for 6 minutes. Once simmered, transfer the curry base to a blender and blend until smooth. If there's visible pieces of pork fat or onions that are bugging you, run the blended base through a fine mesh strainer to separate those parts out.
  3. Return the base to the pot it was previously cooking in and set to medium heat. Once simmering, add in the curry roux blocks and curry powder. Continue stirring until the blocks have fully dissolve, as they will burn on the bottom of the pot otherwise.
  4. When the sauce begins simmering again, add in the Worcestershire sauce, tonkatsu/BBQ sauce, sugar, salt, white pepper, instant espresso, and distilled vinegar. You can also add in any additional spice during this stage, I find ground cayenne pepper works quite well at matching the spiciness found in Coco Ichibanya curry.
  5. Give everything a good stir until homogenized. Cover the pot with a lid and let the curry simmer for an additional five minutes, or until thickened. Coco Ichibanya curry is quite thin, so don't let it go for too long or it will be a gloppy mess.
  6. Serve with short-grain white rice and your protein of choice. The perfect ratio (in my opinion) for curry is 250g of rice to 200g sauce to 150g protein. Any leftover curry sauce can be stored in an airtight container in either the fridge or the freezer.
*Notes:
  1. Pork belly is essentially unsalted, uncured bacon. You can find it in most Asian grocery stores, but bacon will work if you've no access to belly. If you do use bacon, I'd suggest skipping the extra salt in the recipe.
  2. Black pepper is an alternative if you can't find white pepper, but the recipe will benefit from the pungent flavor of the latter; Coco Ichibanya curry leans very heavily on umami, tangy, and bitter notes.
 
Back
Top